How to configure true roaming profiles using Windows XP Professional in
a workgroup environment using the classic NTFS file permissions (not simple
file sharing.)
Copyright
February 16, 2003, published at toups.info All rights reserved.
This
write up assumes that you have a workgroup set up and the computers can see
each other on the network. Furthermore,
we will assume that computer A is the computer on which all the user profiles
currently exist. I have implemented this
on a two computer system.
I
believe, but have not verified, that these instructions will work for
additional systems. These instructions
are issued for informational purposes; the reader assumes any and all
responsibilities for their use.
All steps are required. The following steps are very important but
not obvious: 5, 6b, 9 and 11a-g.
1) If not
currently disabled, disable simple file sharing to allow the use of full NTFS
file permissions. (Note that simple file
sharing is the default for a workgroup environment while classic is the default
for a domain environment. Disable simple
file sharing by going to "Start" Menu -> "My Computer"
-> "Tools" -> "Folder Options..." -> "View"
tab -> in "Advanced Settings" box uncheck "Use Simple File
Sharing (Recommended)"

2) Make sure
that the users that you want roaming profiles for exist on computer A and have
logged on and off of this system to create their local folder structure
(normally in c:\Documents and Settings.)
Also make sure that the roaming users have passwords for their accounts.
3) Create a
folder to use for storage of the master copy of the roaming profiles. This folder can exist on any of the
computers.
a) Log on an account with administrator privileges on
the computer on which you want the master copy of the roaming profiles to exist
on. Create the folder, e.g.,
“Start" Menu -> "My Computer" -> "Local Disk (C:)" -> "File" menu -> "New
Folder", rename as desired, such as "Roaming." Be sure the "Read-only" box is not
selected.
b) Share the folder and set the share permissions on
the folder to allow at least the roaming users to have "Full
Control."
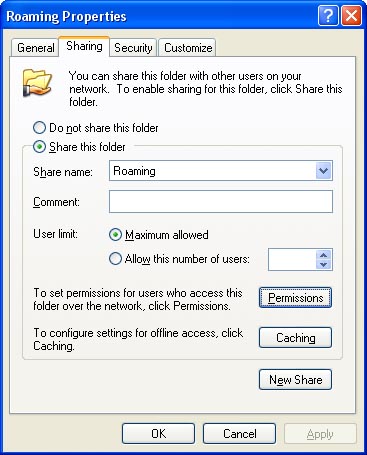

c) Turn off Caching, "Caching" button,
uncheck "Allow caching of files in this shared folder."

d) Set NTFS permissions on the folder. The minimum permissions normally required
are:
Creator/Owner, Full Control, Subfolders and Files Only
Administrator, Full Control (after setup, Administrators can be set to None.)
System, Full Control, This Folder, Subfolders And
Files
Users,
Special, List Folder / Read Data and Create Folders / Append Data, This Folder
Only


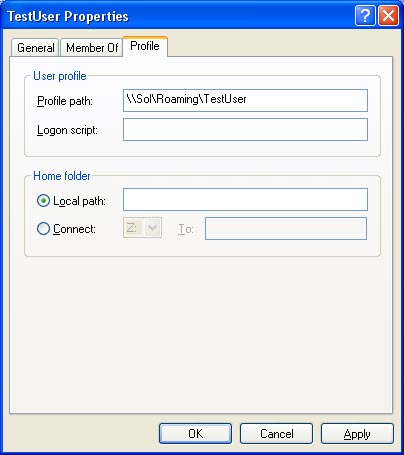
4) On computer
A, set up roaming for each user profile on the first machine. "Start" Menu -> "Control
Panel" -> "Performance and Maintenance" ->
"Administrative Tools" -> "Computer Management" look
under "System Tools" -> "Local Users and Groups" ->
"Users." Double click each
user and under the "Profile" tab set "Roaming Path:" to the
\\Computername\Roaming\Username where \\Computername\Roaming is the name of the
file folder created in step 3. Username
is the name of the user for which the profile is being set up. Important, leave
"Local Path" alone (blank.)
Do not set the local path to the location of the roaming profile master
copy location.

5) On computer
A, enable the group policies for “Do not check for user ownership of Roaming
Profile Folders” and "Add the Administrator security group to the roaming
user profile share" policy using "Start" menu ->
"Run", enter "gpedit.msc" ->
under "Computer Configuration" -> “Administrative Templates” ->
"System" -> "User Profiles" and enabling these two
properties.

6) On computer
A.
a) Log on and off of each account for which roaming
profiles are to be created in order to create the roaming profile folders and
files. Note, minimum permissions for
each user's roaming profile folder should be:
%Username%, Full Control, Owner of Folder
System, Full Control
Administrators, No Permissions (However, using these
instructions, it will be Full Control.
This is needed to perform the remaining steps as written.)
b) Have "Administrator" take ownership of
the roaming profiles by using "Start" menu -> "My
Computer" -> browse to the master roaming folder. Right click on the folder, select
"Properties" -> "Security" tab ->
"Advanced" button -> "Owner" tab and select
"Administrators" and check the box for "Replace owner on subcontainers and objects" and apply.
7) On computer
B (and any remaining computers), create new user profiles for each roaming user
with the same name and password as on computer A. (Do not enter a value for "Roaming
Path:" in this step. This must be
done in step 10.)
8) On computer
B (and any remaining computers), log on and off of each new user profile to
create the initial user profile folder and directory structure.
9) On every
computer, perform step 5 to enable the group policies for “Do not check for
user ownership of Roaming Profile Folders” and "Add the Administrator
security group to the roaming user profile share."
10) On computer B (and any remaining computers), set
up roaming for each user profile on the first machine. Do this by logging on to computer B with an
administrator account and performing the same steps as in step 4 above.
11) On computer B (and any remaining computers), set
the registry permissions on the user hive to allow the computer to modify the
profile. Log on an account that is part of the Administrators group and set the
folder view to show hidden files and file extensions using "Start"
Menu, -> "My Computer"
-> "Tools" -> "Folder Options..." ->
"View" tab -> in "Advanced Settings" select "Show
hidden files and folders" and unselect “Hide extensions for know file
types." Next run regedit, using "Start" menu ->
"Run", enter "regedit"
a) Select HKEY_USERS.
b) Load your roaming profile using "File"
menu -> "Load Hive...", select location
of the user's master roaming profile (completed in step 6 above) NTuser.dat
file, nominally \\computername\Roaming\%Username%\NTuser and click
"Open." Enter username at
prompt for "Key Name:"

c) Select the folder under HKEY_USERS with the
username that you entered in step d.
Right click and select "Permissions..." from the pull down
menu. Click the "Add" button. Enter the username and click "OK."


d) With the username selected, select the "Full
Control" permission checkbox. The
unknown user(s) corresponds to the user's identity on the other computer(s).
e) Click on the "Advanced" button, and in the "Advanced Security Settings for
Username" window, select "Replace permission entries on all child
objects with entries shown here that apply to child objects" and click
"Apply" and answer "Yes" to the prompt. Click "OK" and "OK" to
close the permission windows.

f) Select the username folder under HKEY_USERS and
run "File" menu -> "Unload Hive" and respond
"Yes."
g) Copy the roaming profile NTuser.dat and
NTuser.dat.log files to the local profile, i.e., copy \\computernameA\Roaming\%Username%\NTuser.dat
and \\computernameA\Roaming\%Username%\NTuser.dat.log to c:\Documents and
Settings\%Username%\NTuser.dat and c:\Documents and
Settings\%Username%\NTuser.dat.log on the current machine.
h) Repeat steps a through g for each roaming user
(and for every roaming user on each additional computer. I have only tried this for two computers, A
and B.)
12) On computer B (and any remaining computers), log
on and log off each roaming user.
Troubleshooting and notes
There is a log file at
C:\WINDOWS\Debug\UserMode\userenv.log or
(%windows%\Debug\UserMode\userenv.log.)
Enhanced logging can be turned on by creating a registry key. See http://support.microsoft.com/default.aspx?scid=kb;en-us;221833
use a value of 30002 hex for the most information.
If you are unable to access any items in menus and
nothing is visible in the start menu, then most likely, the registry
permissions are not properly set. Be
sure the user has full control of all keys in the hive for both the local and
roaming profiles. (Basically see step 10
but do check both local and roaming copies of NTuser.dat, you may need to
change both if something was messed up the first time.)
If you have are unable to load the profile from
computer B, make sure that Administrators is the owner of the roaming
profile. The computer requires the owner
to be Administrators or the current user.
However, without a domain, the system does not recognize the same user
on different machines as the same. (See
step 6b.) Also, make sure that the step
9 was successfully performed; otherwise, the loading will fail because it does
not recognize the current owner properly.
There appears to be a problem where .jpg wallpaper
does not appear to roam properly.
However, the registry settings are being updated properly. Usually, if you go to the desktop tab after
right clicking for properties on the desktop, you will find the proper
wallpaper file is actually selected.
Clicking "OK" will cause it to display.
References:
Microsoft
Windows XP: User Data and Settings Management
Guide To
Windows NT 4.0 Profiles and Policies